


- Choose the Right File Format
- Resize Before You Upload
- Compress Without Killing Quality
- Rename Your Files for SEO
- Write Alt Text That Works for SEO + Accessibility
- Audit Your Showit Site Speed After Image Optimization (Check Your Work!)
- 📥 Cheatsheet: Showit Image Optimization
- Final Thoughts: Start Where You Are
- Pin It / Share It / Save It
Optimize images for Showit by following this complete, step‑by‑step guide — from choosing file types to writing alt text — so your site looks good, loads fast, and earns serious trust from Google.
Before we dive in, hey, I’m Jordin — web designer, SEO strategist, and the creative behind Unica Formo. I’ve helped wellness professionals, therapists, photographers, service providers, and creative entrepreneurs build Showit websites that don’t just look good — they perform. I care about helping you get found, fast. That means satisfying Google’s algorithm just as much as serving your people.
If you want your Showit site to load quickly, rank better, and get taken seriously by Google, this is your one-stop guide. I’m giving you everything I know about image optimization — including free tools, step-by-step examples, video walkthroughs, and where to place images or GIFs to help your audience understand. You don’t have to do it all at once, but start now and build good habits.
And yes — this applies to every main website page and every single blog post.
Why You Have to Optimize Images for Showit
Sure, slow websites lose visitors — but more importantly, Google pays close attention to your load time, structure, and image SEO. Optimizing your images shows Google that your site is fast, accessible, and worth ranking.
Your goal isn’t just to make your site look good — it’s to be seen as a credible, valuable resource by Google. Every image contributes to that perception.
“For every 100ms decrease in homepage load speed, conversion rates increase by 1.11%.” — Deloitte
That’s why optimizing images is crucial: it’s the quiet SEO powerhouse behind your visuals.
As part of my design workflow (you can read more in my custom web design process post), I always resize and compress before I ever upload images—it’s non-negotiable.
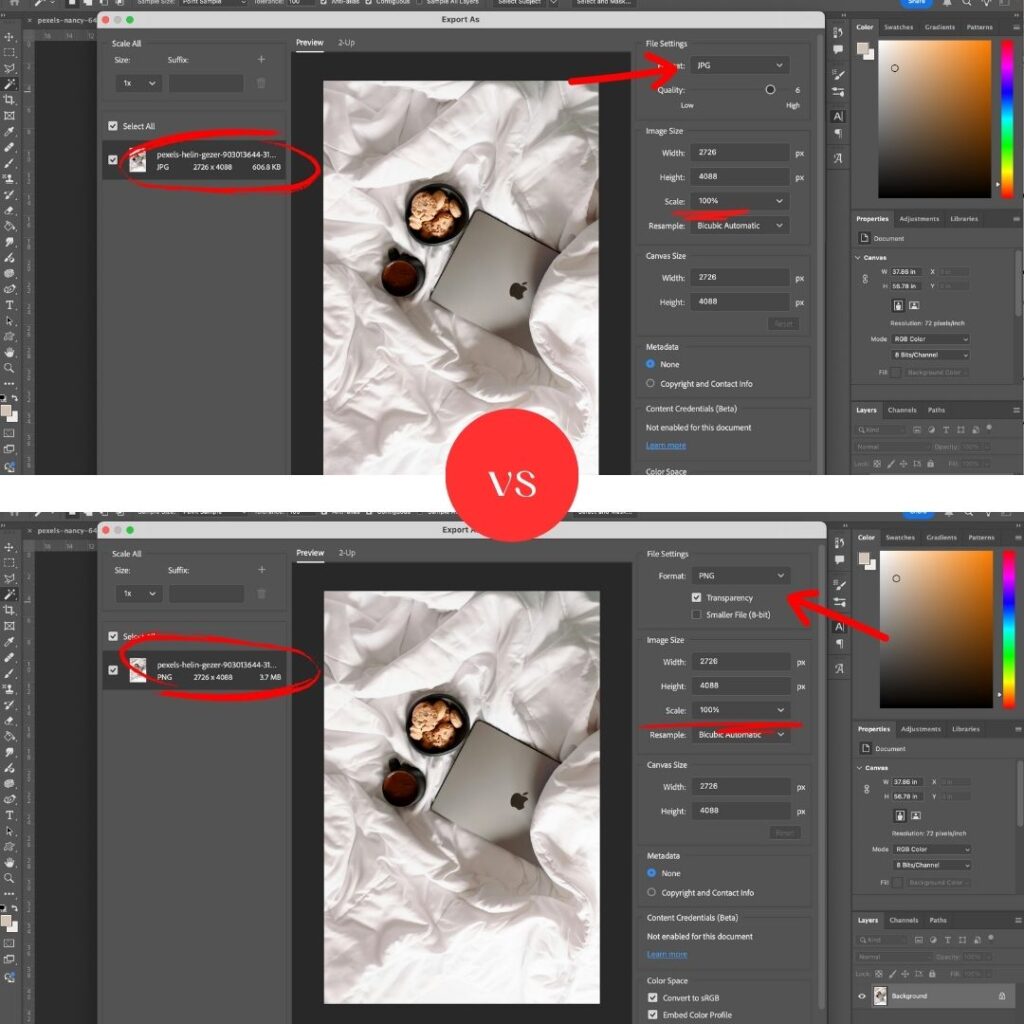
Choose the Right File Format
Choosing the right format for your images affects both how they look and how fast they load.
Showit supports JPG, PNG, and GIF. JPG is your go-to for most images. PNG should only be used when you truly need transparency (like for logos). GIFs can work for simple animations, but don’t overuse them.
| Format | Best For | Notes |
|---|---|---|
| JPG/JPEG | Photos, canvas backgrounds | Best for Showit. Balanced quality + file size. |
| PNG | Logos, icons, transparency | Use sparingly. Heavy file sizes. |
| GIF | Simple animations | Use only when necessary. |
WebP is more efficient, but currently not supported in Showit. If you’re using WordPress for your blog, install Smush to auto-optimize blog images with WebP.
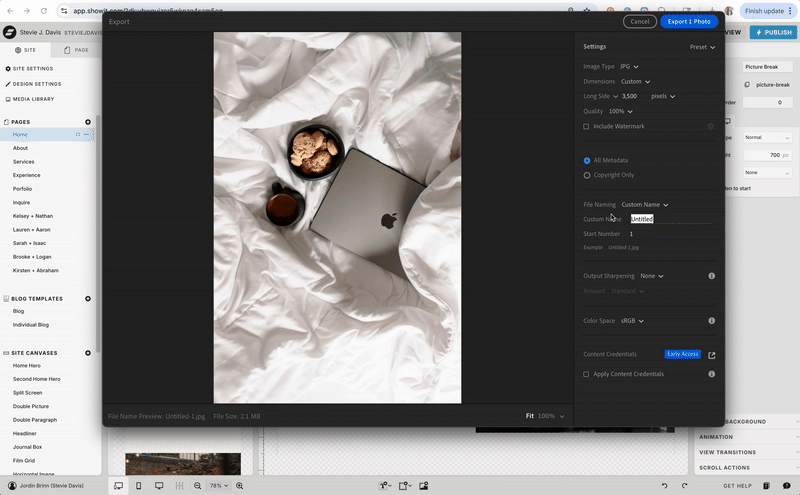
Resize Before You Upload
Uploading a 6000px image when you only need 1200px is like parking a semi truck in a compact spot — it slows everything down and wastes space.
Showit recommends a max width of 3500px on the long edge.
Here’s how to resize images with the most common tools:
Canva:
- Open your image and click “Resize” in the top toolbar
- Enter 3500px for the width
- Export as JPG
Preview (Mac):
- Open image in Preview
- Go to Tools > Adjust Size
- Change width to 3500px (height adjusts automatically)
- File > Export > Format: JPEG
Photoshop:
- Open image
- Go to Image > Image Size > set width to 3500px
- File > Export > Save for Web (Legacy) > JPG > adjust quality
Illustrator:
- File > Export > Export As > JPG
- Select “Use Artboards” if needed
- In the export settings, set resolution to 72ppi and max width to 3500px
Compress Without Killing Quality
Once resized, it’s time to compress. Compression reduces file size without sacrificing visible quality. This is what keeps your site fast.
Target Sizes:
- Canvas background images: 300–500KB (keep these limited)
- All other images: under 250KB
Showit’s magic number = under 300KB
How to Compress:
TinyPNG / TinyJPG:
- Go to TinyJPG
- Upload images (up to 20 at once)
- Download compressed versions
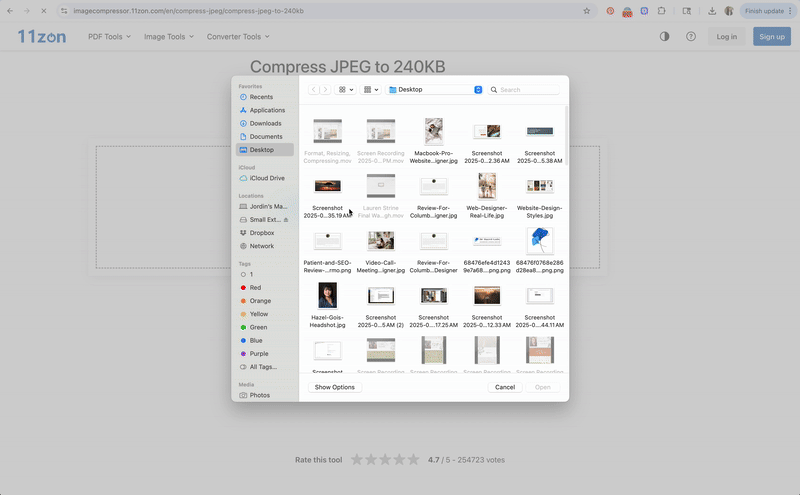
11zon:
- Visit 11zon Image Compressor
- Upload images
- Choose compression level (start with 70–80%)
- Download optimized files
Squoosh:
- Go to Squoosh
- Upload an image
- Adjust sliders for quality, format, and file size
- Export
Photoshop:
- File > Export > Save for Web (Legacy)
- Choose JPG format
- Set quality until file is below 300KB
Illustrator:
- File > Export As > JPG
- Under export settings, check “Use Optimized” and adjust quality slider
Rename Your Files for SEO
Google reads your image file names. Renaming your images is a chance to describe them using keywords, build context, and support your overall SEO.
Good Naming Practices:
- Use hyphens to separate words:
charlotte-therapist-office-couch.jpg - Keep it descriptive: who, what, where
- Avoid spaces, underscores, symbols
Bulk Rename (Mac):
- Highlight all images
- Right click > Rename > Format: Name and Index
- Start with a base name (like “bride-victoria-plantation”)
- Tweak manually if needed
Example Names:
Photographer:
bride-posing-red-rocks-utah.jpgwedding-ceremony-vineyard-golden-hour.jpg
Therapist:
cozy-therapy-room-neutral-decor.jpgwoman-writing-notes-in-office.jpg
📸 Image Suggestion: Screenshot of Mac rename tool with batch renaming
🎥 Video Suggestion: How to rename multiple images with one click and customize them
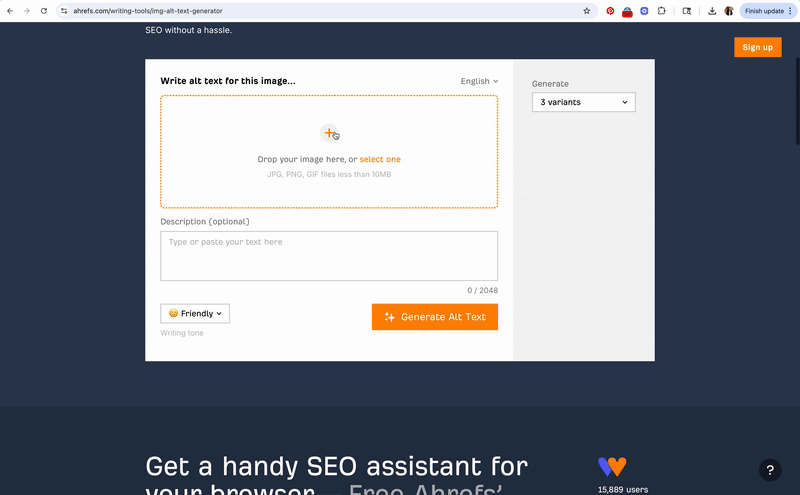
Write Alt Text That Works for SEO + Accessibility
Alt text does two big things: it makes your site accessible to screen readers and helps Google understand your image content.
Good vs Bad Examples:
| ✅ Good | ❌ Bad |
| “Blonde therapist journaling by window” | “image1.jpg” |
| “Bride and groom kiss at sunset at Jorgenson Farms in Columbus, Ohio” | “wedding photo Charlotte” |
| “Cozy neutral-toned Dallas, TX counseling office” | “photo of office” |
What to Aim For:
- Keep it under 125 characters
- Describe exactly what’s in the photo
- Include a keyword if it fits naturally
- Don’t keyword stuff or use vague phrases
Free Tools to Help:
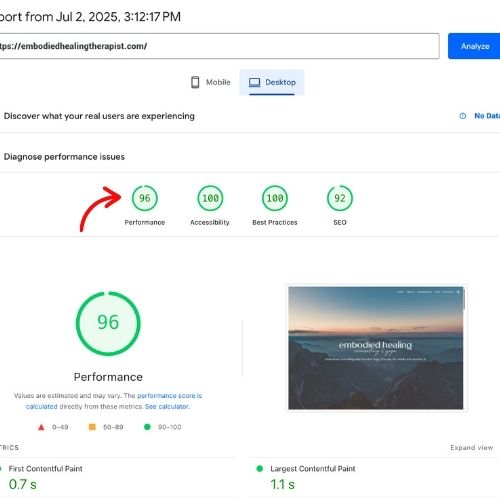
Audit Your Showit Site Speed After Image Optimization (Check Your Work!)
Even when you do everything right, something can get missed. That’s why a site speed test is crucial.
Use These Tools:
These tools will flag:
- Oversized images still on your site
- Slow loading pages
- Mobile performance issues
📥 Cheatsheet: Showit Image Optimization
| Step | Recommendation |
| File Type | JPG for most, PNG only for transparency |
| Max Width | 3500px max (long edge) |
| File Size | 250KB general, 300–500KB for large visuals |
| Naming | Hyphenated, descriptive, keyword-relevant |
| Alt Text | Clear, keyword-aware, under 125 characters |
| Speed Check | Run tests using PageSpeed + GTmetrix |
Final Thoughts: Start Where You Are
Optimizing images doesn’t have to be overwhelming. You don’t have to fix everything overnight. Instead, work it into your existing routine:
- Compress while you’re editing
- Rename before upload
- Write clear alt text as you go
And remember: this work matters on every main page and every blog post. Google notices when you put in the effort — and it rewards you with better rankings, faster indexing, and more traffic.
Want to deepen your website’s credibility even further? Check out my post on 5 Ways to Build Trust on Your Website for simple, actionable strategies.
Want help making your Showit site a search-friendly powerhouse? That’s what I do.
👉 www.unicaformo.com
Pin It / Share It / Save It
Know a creative still uploading 4MB PNGs? Send them this post 🙃

Jordin Brinn is the founder and lead designer of Unica Formo — a creative studio in Columbus, Ohio, specializing in custom Showit website design and brand strategy for service-based businesses like coaches, consultants, therapists, creatives, and wellness professionals. With over a decade of business experience, she helps clients bring strategy, clarity, and personality to their online presence.
Explore design services and free resources at unicaformo.com.


