


If you’ve ever updated your website pages or restructured your blog posts, you’ve probably wondered how to set up redirects on Showit so visitors don’t end up on broken links. Maybe someone bookmarked one of your old blog posts, or another website linked to a page that no longer exists. When visitors (or Google) click that outdated link, they hit a 404 error page—and that’s bad news for both your user experience and your SEO.
The good news? You can fix it with redirects.
I’m Jordin Brinn, the designer behind Unica Formo, where I help therapists, creatives, and wellness professionals launch websites that look beautiful and work hard behind the scenes. Redirects are one of those behind-the-scenes things that make a big difference in how your site performs.
In this guide, I’ll walk you step by step through how to set up redirects in Showit, plus how to do it in WordPress (if you’re using a Showit + WordPress blog).
Along the way, I’ll share why redirects matter, how to check for broken links, and tips to keep your site SEO-friendly.
Why Redirects Matter (and Why Broken Links Are Bad for SEO)
Every link on your site is a pathway—for your visitors and for search engines. When one of those links breaks, a few things happen:
- Visitors hit a dead end. Instead of the helpful page they expected, they get an error. Not a great look.
- Google downgrades your site quality. Too many broken links send a signal that your site isn’t well maintained, which can hurt your rankings.
- You lose “link juice.” If another site linked to you, that authority boost gets wasted when the link goes nowhere.
That’s where knowing how to set up redirects on Showit (or WordPress, if you’re blogging) makes all the difference. A redirect is simply a way to tell browsers (and Google):
“Hey, the page you’re looking for has moved. Here’s the new address.”
It’s quick, effective, and keeps your website healthy.
👉 Pro tip: Use a tool like BrokenLinkCheck.com to scan your site and catch any broken links you might have missed.
If you want to dive deeper into Showit and SEO foundations, check out:
- What is Showit?
- How to Blog for SEO (So Google Actually Ranks Your Content)
- The Ultimate Guide to Optimize Images for Showit: Boost Speed, SEO & Rankings
How to Set Up Redirects in Showit
Showit makes it easy to redirect an old URL to a new one directly inside the platform. Here’s how to do it:
- Log into Showit.
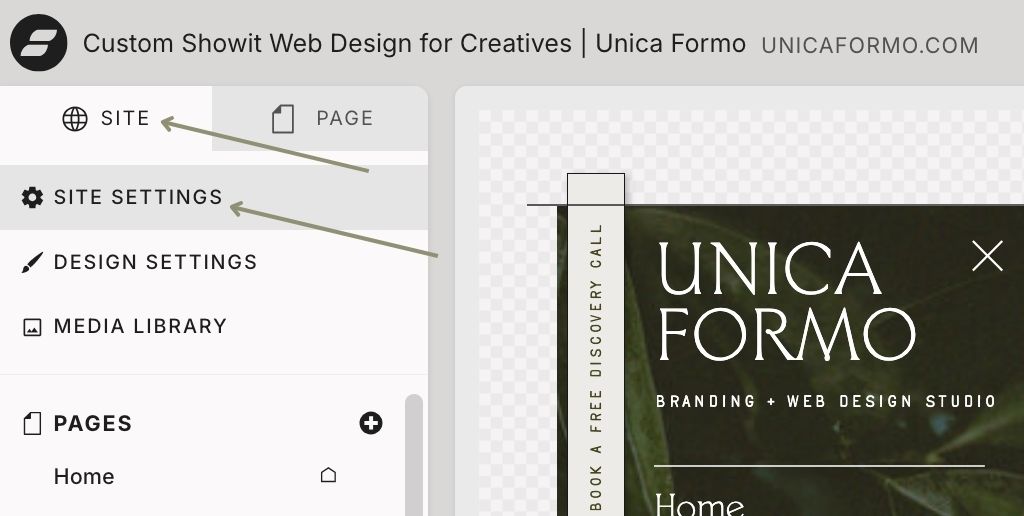
Open your Showit dashboard and select the site you want to edit. - Go to “Site Settings.”
In the left panel, click the three dots next to your site name → choose Site Settings.
- Find the “Custom Domains” tab.
Within Custom Domains tab, click on the gear icon. - Add your redirect.
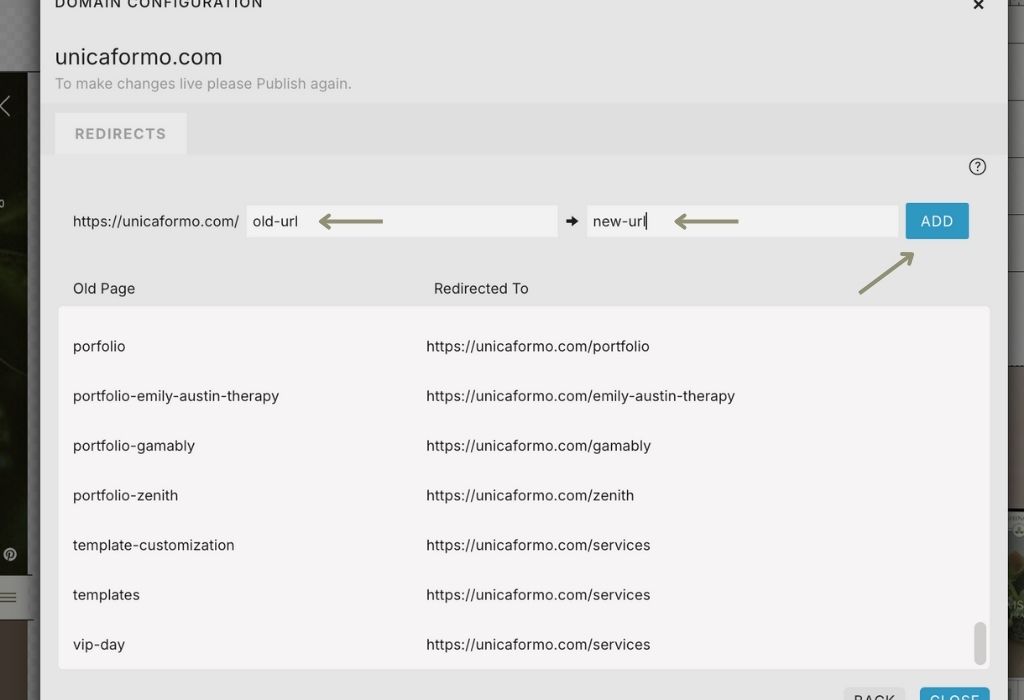
- In the Old Path field, enter the part of the URL you want to redirect after your domain.
Example: if you want to redirectwww.yoursite.com/services-old→www.yoursite.com/services, just enter/services-old. - In the Redirect To field, enter the full new URL.
- In the Old Path field, enter the part of the URL you want to redirect after your domain.
- Save your changes.
Click Save and Showit will take care of the rest.

How to Set Up Redirects in WordPress (With the Redirection Plugin)
If you’re using Showit with a WordPress blog, you’ll also want to manage redirects on the WordPress side. The easiest way is with the free Redirection plugin.
Here’s how:
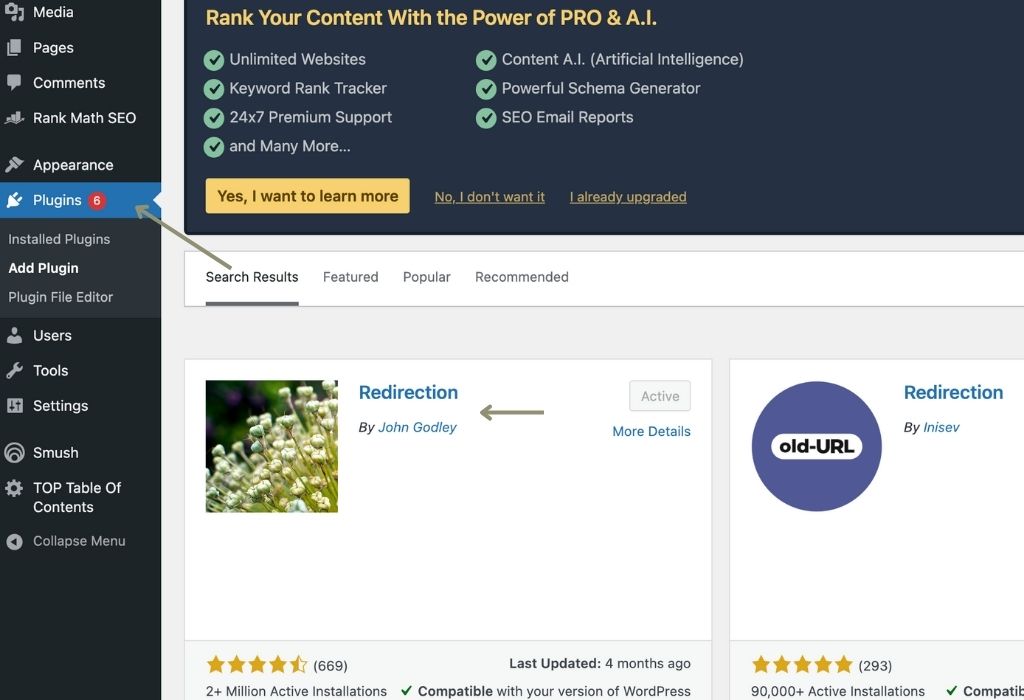
- Install the plugin.
- Log into your WordPress dashboard.
- Go to Plugins → Add New.
- Search for Redirection by John Godley.
- Click Install Now, then Activate.
*if you have Showit’s Basic Blog subscription this plugin should automatically be installed.
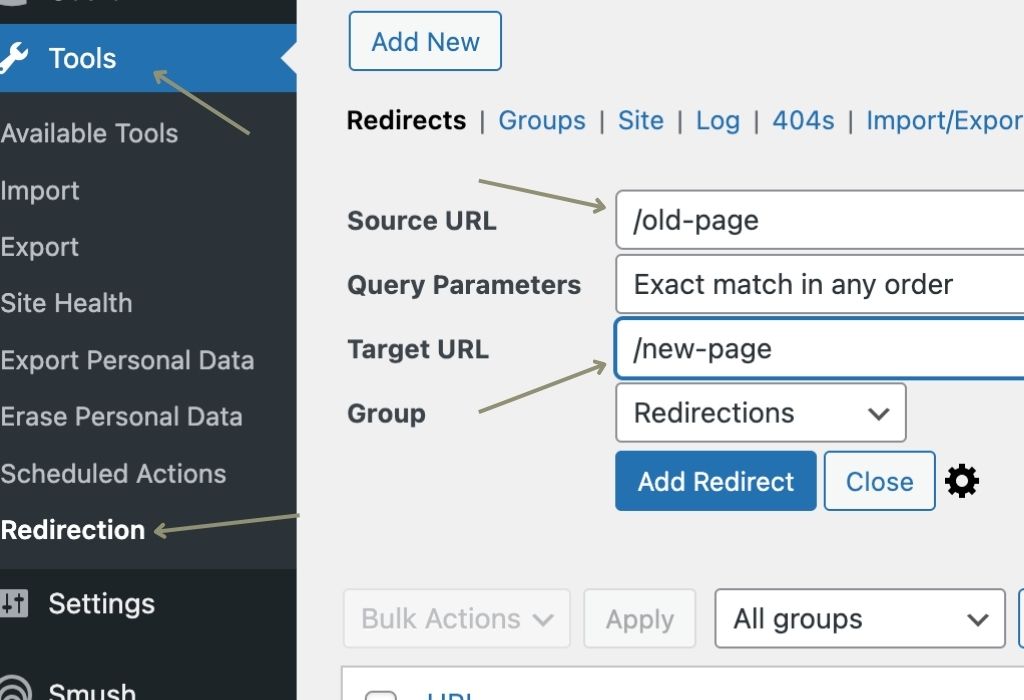
- Access the Redirection settings.
- In your WordPress menu, go to Tools → Redirection.
- Complete the quick setup (you can leave the default settings).
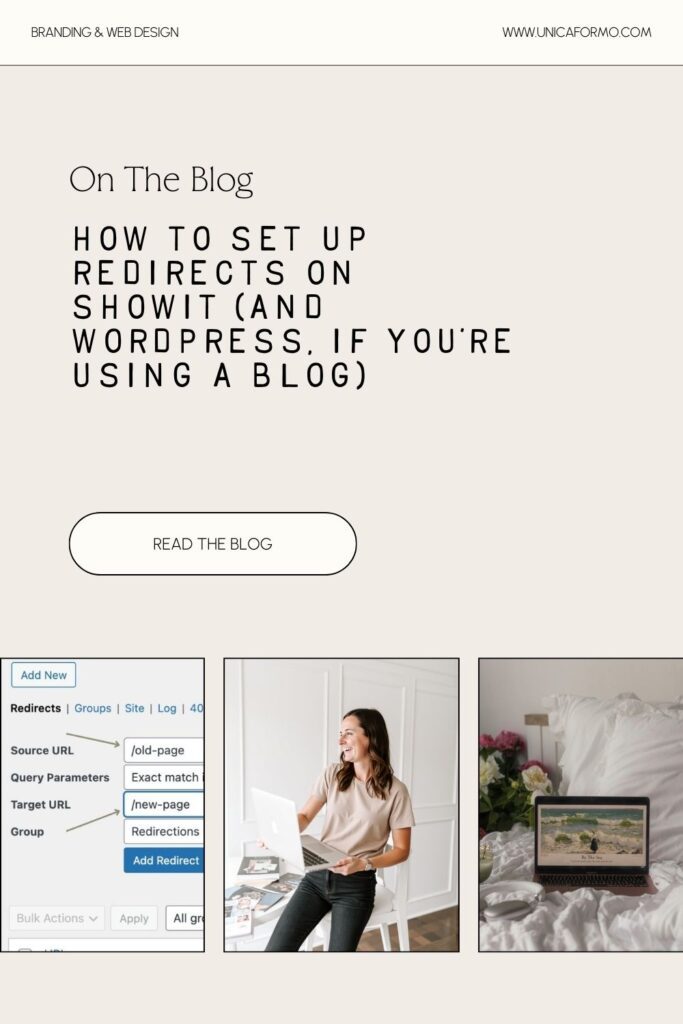
- Add your redirect.
- In the Source URL field, enter the old URL path (e.g.,
/old-blog-post). - In the Target URL field, enter the full new URL (e.g.,
https://yoursite.com/new-blog-post).
- In the Source URL field, enter the old URL path (e.g.,
- Save your redirect.
Click Add Redirect—and you’re done.
Best Practices for Redirects
- Always use 301 redirects. These tell search engines the move is permanent.
- Redirect to the most relevant page. Don’t just send everything to your homepage—point users where they actually wanted to go.
- Keep track of your redirects. Too many layered redirects (old → newer → newest) can slow down your site.
- Scan regularly for broken links. Run BrokenLinkCheck.com every few months, especially after big updates.
Wrapping It Up
Redirects might feel like a tiny detail, but they make a huge impact. By setting them up in Showit (and in WordPress if you’re blogging), you’ll:
- Keep your visitors happy.
- Protect your SEO rankings.
- Make sure every link pointing to your site works for you, not against you.
So the next time you update your website or reorganize your blog, don’t forget this step—it’s quick, simple, and so worth it.
✨ Want a Showit site that’s both stunning and strategic? That’s what I do. Reach out here and let’s create a website that helps your business grow.
Pin for Later:

Jordin Brinn is the founder and lead designer of Unica Formo — a creative studio in Columbus, Ohio, specializing in custom Showit website design and brand strategy for service-based businesses like coaches, consultants, therapists, creatives, and wellness professionals. With over a decade of business experience, she helps clients bring strategy, clarity, and personality to their online presence.
Explore design services and free resources at unicaformo.com.


